index
V3/V3.1
::::info This device may have issues charging a connected battery if utilizing a USB-C to USB-C cable. It's recommended to use a USB-A to USB-C cable.
:::caution Be careful when interacting with the USB-C port. This device does not have ESD protection for the CP2102 USB to UART bridge chip. :::
::::
- MCU:
- ESP32-S3FN8 (WiFi & Bluetooth)
- LoRa Transceiver:
- Semtech SX1262
- Frequency Options:
- 433 MHz
- 470 - 510 MHz
- 863 - 870 MHz
- 902 - 928 MHz
- Connectors:
- USB-C
- Antenna:
- Dedicated 2.4 GHz metal spring antenna for WiFi/Bluetooth
- U.FL/IPEX antenna connector for LoRa
V3.1 differences
Firmware remains the same as V3 below. Compare schematics: V3.0 and V3.1. Key differences:
- Removal of FDG6322C (a dual N & P channel FET) from the V3.1 power supply.
- Antenna filter values in V3.1 (L11 = 1.8pF, C15 = 2.7nH, C24 = 1.8pF) align more closely with ESP32-S3 reference design than V3.0 (L11 = 1.6nH, C15 = 6.9pF, C24 = 2.4pF).
Features
- Built in 0.96 inch OLED display
- User and Reset Buttons
- No GPS
Meshtastic I2C Definitions
- SDA: GPIO41
- SCL: GPIO42
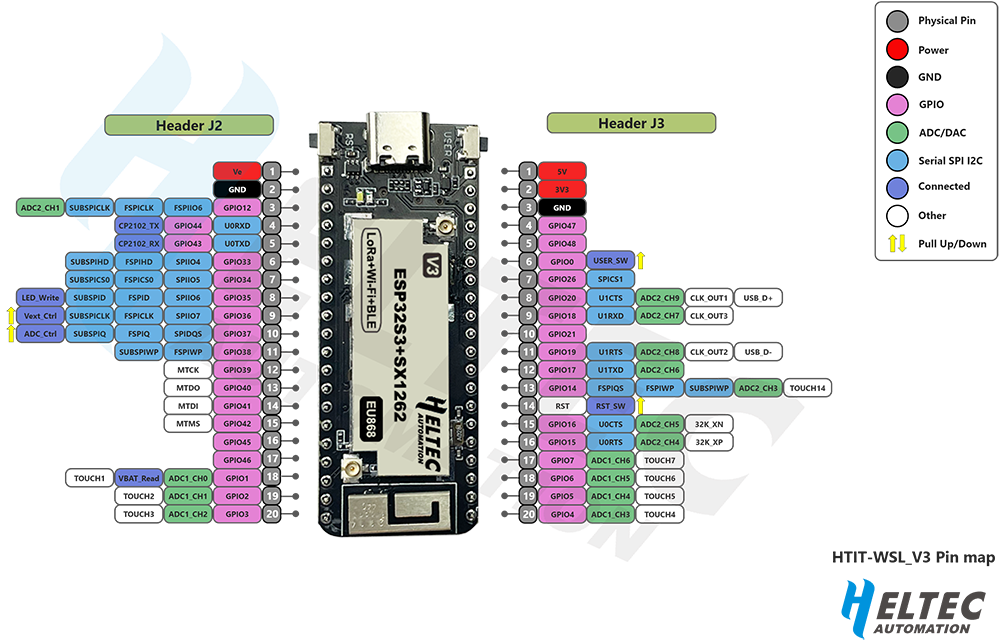
Pin Map
_V3.webp)
Image Source: Heltec
_V3.png)
Resources
- Firmware file:
firmware-heltec-v3-X.X.X.xxxxxxx.bin - Purchase links
- US
- International
Wireless Stick Lite V3
:::info This device may have issues charging a connected battery if utilizing a USB-C to USB-C cable. It's recommended to use a USB-A to USB-C cable. :::
- MCU:
- ESP32-S3FN8 (WiFi & Bluetooth)
- LoRa Transceiver:
- Semtech SX1262
- Frequency Options:
- 433 - 510 MHz
- 470 - 510 MHz
- 863 - 870 MHz
- 902 - 928 MHz
- Connectors:
- USB-C
- Antenna:
- Dedicated 2.4 GHz stamped metal antenna for WiFi/Bluetooth
- U.FL/IPEX antenna connector for LoRa (next to the V3 icon)
Features
- No display.
- User and Reset Buttons
- Additional GPIO availability
- No GPS
Meshtastic I2C Definitions
- SDA: GPIO41
- SCL: GPIO42
Pin Map

Image Source: Heltec

Image Source: Heltec
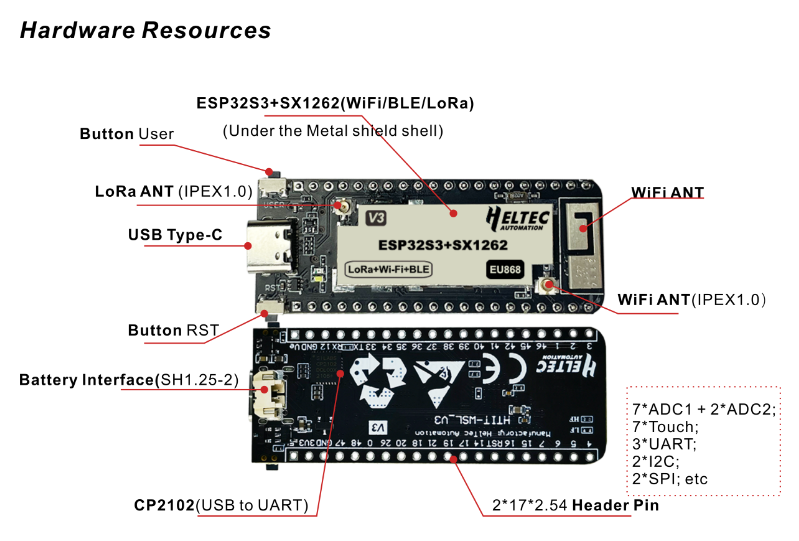
There are two antenna connectors. You need to connect the LoRa antenna while the WiFi antenna is optional.
Resources
- Firmware file:
firmware-heltec-wsl-v3-X.X.X.xxxxxxx.bin - Purchase Links:
- US
- International
- From Heltec
- Documentation (docs.heltec.org)
- Schematic Diagram (PDF)
- LoRa Node Development Kit (PDF)
Wireless Tracker v1.0
:::info This device may have issues charging a connected battery if utilizing a USB-C to USB-C cable. It's recommended to use a USB-A to USB-C cable. :::
- MCU:
- ESP32-S3FN8 (WiFi & Bluetooth)
- LoRa Transceiver:
- Semtech SX1262
- Frequency Options:
- 470 - 510 MHz
- 863 - 870 MHz
- 902 - 928 MHz
- Connectors:
- USB-C
- Antenna:
- Dedicated 2.4 GHz metal spring antenna for WiFi/Bluetooth
- U.FL/IPEX antenna connector for LoRa and GNSS
Features
- Onboard 0.96-inch LCD display
- User and Reset Buttons
Flashing
To flash ESP32-S3 devices like the Wireless Tracker, you typically need to place them in Espressif's firmware download mode. Use the "1200bps reset" button in the web flasher to do this. If this method does not work for any reason, you can follow the manual process below.
:::warning
Do not proceed unless an antenna is connected to avoid possible damage to the device's radio.
:::
The following process will manually place the device into the Espressif Firmware Download mode:
- Unplug the device.
- Press and hold the USER button.
- Plug device in.
- After 2-3 seconds, release the USER button.
With the device now in the Espressif Firmware Download mode, you can proceed with flashing using one of the supported flashing methods. It's generally recommended to use the Web Flasher. You can select "Heltec Wireless Tracker" from the device drop-down.
Pin Map
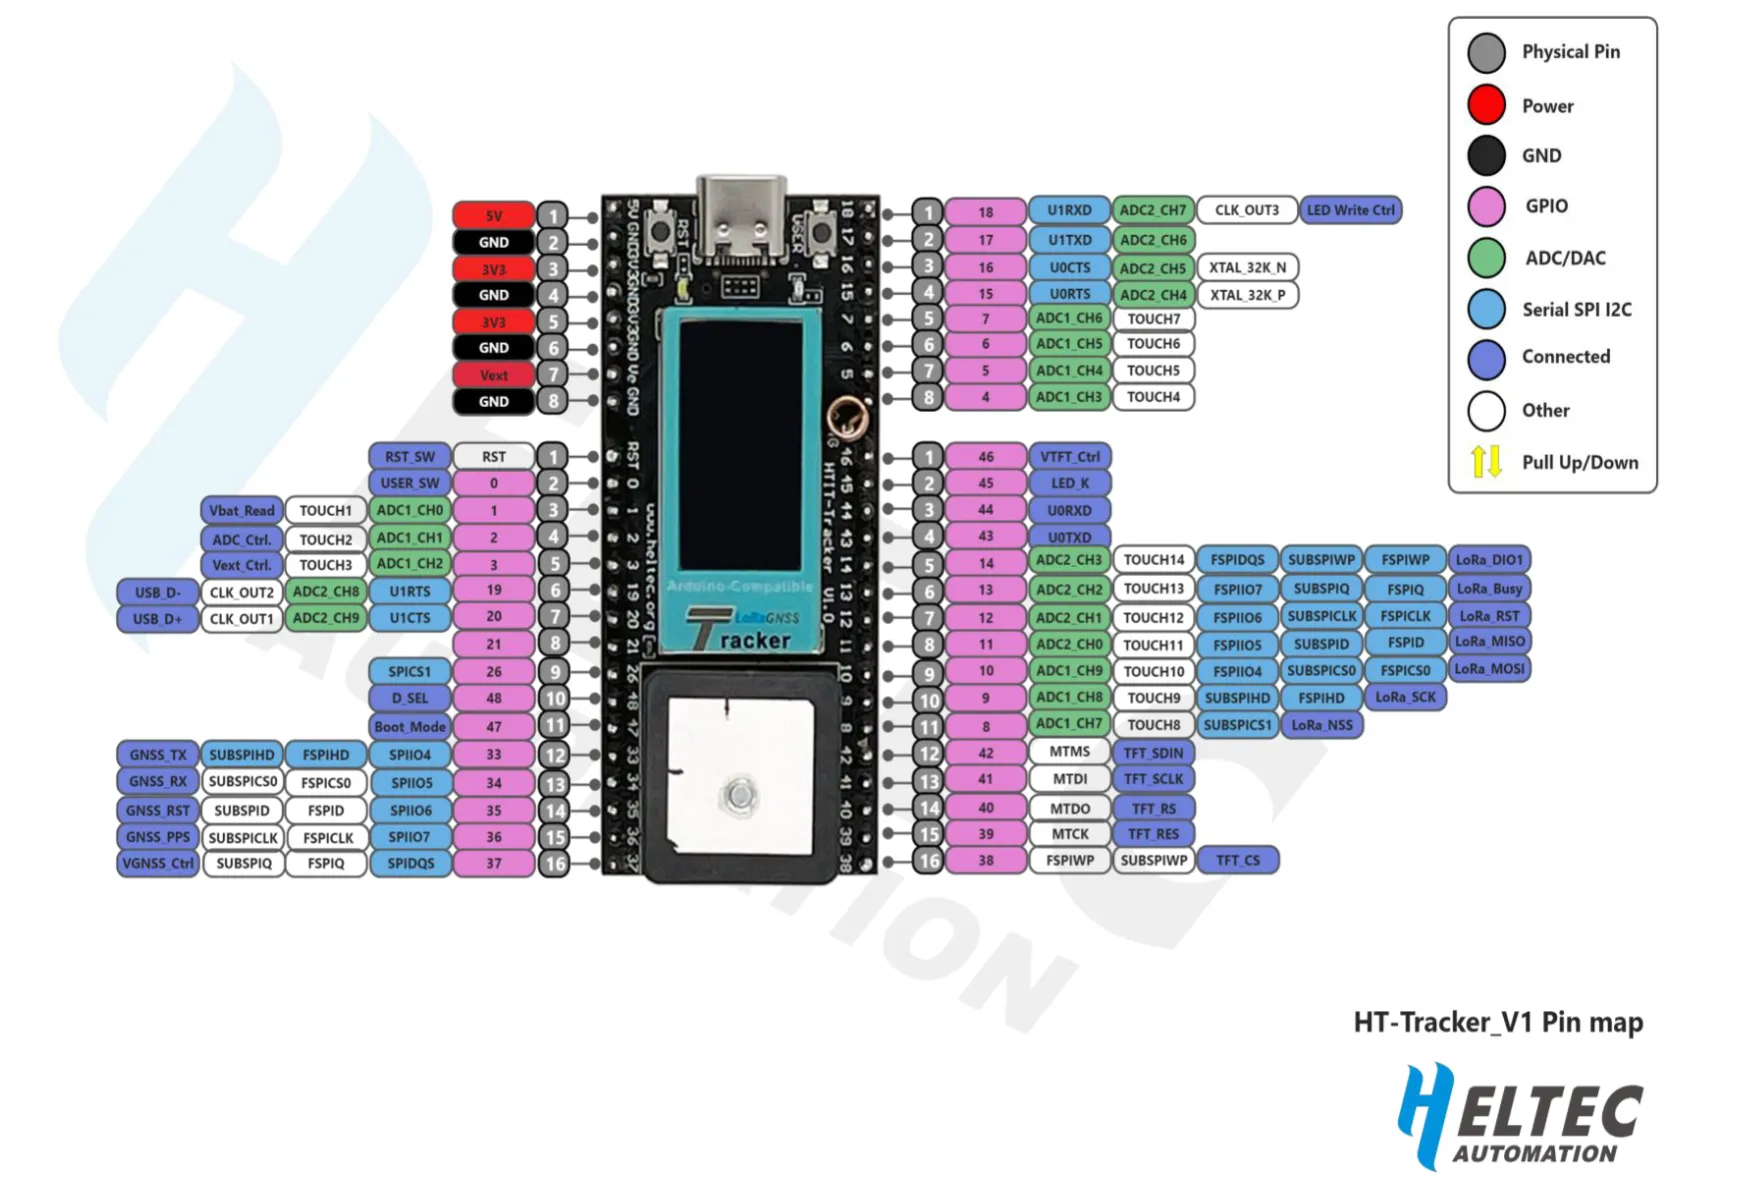
Image Source: Heltec
Resources
- Firmware file:
firmware-heltec-wireless-tracker-V1-0-X.X.X.xxxxxxx.bin
:::note
Heltec revised the Wireless Tracker schematics and released a V1.1, most devices being sold are now V1.1.
:::
Wireless Tracker v1.1
:::info This device may have issues charging a connected battery if utilizing a USB-C to USB-C cable. It's recommended to use a USB-A to USB-C cable. :::
- MCU:
- ESP32-S3FN8 (WiFi & Bluetooth)
- LoRa Transceiver:
- Semtech SX1262
- Frequency Options:
- 470 - 510 MHz
- 863 - 870 MHz
- 902 - 928 MHz
- Connectors:
- USB-C
- Antenna:
- Dedicated 2.4 GHz metal spring antenna for WiFi/Bluetooth
- U.FL/IPEX antenna connector for LoRa and GNSS
Features
- Onboard 0.96-inch LCD display
- User and Reset Buttons
Flashing
To flash ESP32-S3 devices like the Wireless Tracker, you typically need to place them in Espressif's firmware download mode. Use the "1200bps reset" button in the web flasher to do this. If this method does not work for any reason, you can follow the manual process below.
:::warning
Do not proceed unless an antenna is connected to avoid possible damage to the device's radio.
:::
The following process will manually place the device into the Espressif Firmware Download mode:
- Unplug the device.
- Press and hold the USER button.
- Plug device in.
- After 2-3 seconds, release the USER button.
With the device now in the Espressif Firmware Download mode, you can proceed with flashing using one of the supported flashing methods. It's generally recommended to use the Web Flasher. You can select "Heltec Wireless Tracker" from the device drop-down.
Meshtastic I2C Definitions
- SDA: GPIO41
- SCL: GPIO42
Pin Map
Image Source: Heltec
Resources
- Firmware file:
firmware-heltec-wireless-tracker-X.X.X.xxxxxxx.bin - Purchase Links:
- US
- International
Wireless Paper V1.0
:::info The Wireless Paper V1.0 is listed as "Wireless Paper V1.0" in the firmware files and on the web flasher.
This device may have issues charging a connected battery if utilizing a USB-C to USB-C cable. It's recommended to use a USB-A to USB-C cable. :::
- MCU:
- ESP32-S3FN8 (WiFi & Bluetooth)
- LoRa Transceiver:
- Semtech SX1262
- Frequency Options:
- 433 MHz
- 470 - 510 MHz
- 863 - 870 MHz
- 902 - 928 MHz
- Connectors:
- USB-C
- Antenna:
- U.FL/IPEX antenna connector for LoRa
- Integrated 2.4 GHz PCB antenna
Features
- Onboard 2.13-inch black and white E-Ink display screen
- User and Reset switches
- No GPS
Resources
- Firmware file:
firmware-heltec-wireless-paper-v1_0-X.X.X.xxxxxxx.bin - Purchase Links:
- International
Wireless Paper V1.1
:::info The Wireless Paper V1.1 is listed as "Wireless Paper" in the firmware files and on the web flasher.
This device may have issues charging a connected battery if utilizing a USB-C to USB-C cable. It's recommended to use a USB-A to USB-C cable. :::
- MCU:
- ESP32-S3FN8 (WiFi & Bluetooth)
- LoRa Transceiver:
- Semtech SX1262
- Frequency Options:
- 433 MHz
- 470 - 510 MHz
- 863 - 870 MHz
- 902 - 928 MHz
- Connectors:
- USB-C
- Antenna:
- U.FL/IPEX antenna connector for LoRa
- Integrated 2.4 GHz PCB antenna
Features
- Onboard 2.13-inch black and white E-Ink display screen
- User and Reset switches
- No GPS
Resources
- Firmware file:
firmware-heltec-wireless-paper-X.X.X.xxxxxxx.bin - Purchase Links:
- US
- International